


I was recently asked what my five favorite tips or hints for Microsoft Word were. So, I sat down and thought it through. This is what I came up with:
There are a LOT of shortcuts available for use in the Microsoft apps. I am not recommending learning them all. In fact, I find it quite annoying that so many employers think that it is some kind of magic interview test to see if you know that Alt, H, D, R is the shortcut for Find and Replace. No, I’m talking about the shortcuts that you will actually use on a daily basis, are easy to remember, and will actually help reduce the time it takes to complete your tasks. The ones that help me the most are:
Ctrl + F = find (then I can click on the replace tab)
Ctrl + A = all
Ctrl + C = copy
Ctrl + X = cut
Ctrl + V = paste
Ctrl + B = bold
Ctrl + U = underline
Ctrl + K = Opens the popup to add a hyperlink
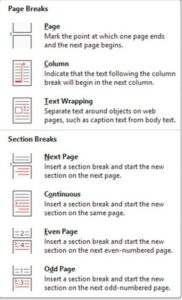 First you need to know the difference between a page break and a section break.
A page break forces the text to stop where you are and start on the next page. For example, an author will put a page break after the last sentence in a chapter so that the next chapter begins on the next page.
Section breaks are used for more complex reasons, and you have more options.
As you can see on the right, you can request a section break that starts a new section on the next page, start the next section on the same page, or start the next section on the next even or odd page. Starting a new section allows you to change the header and footer, change the margins, change the layout, … and so much more.
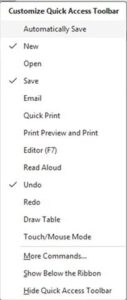
The Quick Access Toolbar is a customizable toolbar that gives you quick access to frequently used commands. By default, it contains commands like Save, Undo, and Redo, but you can add your own commands as well.
To customize the Quick Access Toolbar:
This tip adds to your speed and efficiency when working in Microsoft Word!
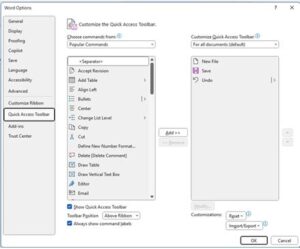
Note: If there is a command that is not showing in the Options list, try right clicking on it on the Ribbon. You will probably be able to add it to the Quick Access Toolbar from there.
This is how I added the exponent command that I needed for doing math equations.
This is my Quick Access Toolbar:

New * Save * Save As * Undo * Redo * Insert Table * Exponent * Symbols * Page Break
BEFORE YOU SEND IT SO THAT OTHERS CANNOT EDIT IT.
I’ll preface this by saying that it is not foolproof, but it does slow them down.
Once you have created your project in Word, save it in your files as a Word docx, but then save it as a pdf.
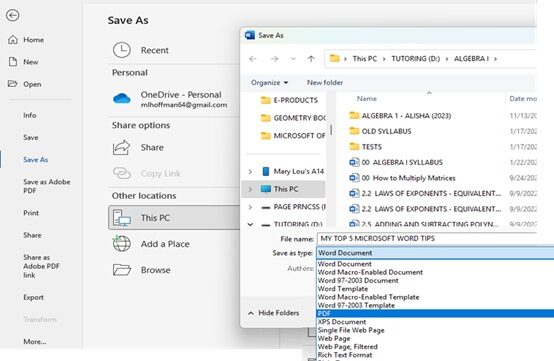
Go to File > Save As > This PC > (find the folder you want to use)
You’ll then get the Save As pop-up. Under the file name, you can change the Save as type to PDF.
This is the copy that you would want to send out to students, the public, co-workers, etc.
Now, you are asking, “but what if I want them to be able to respond.” That brings us to the next tip.
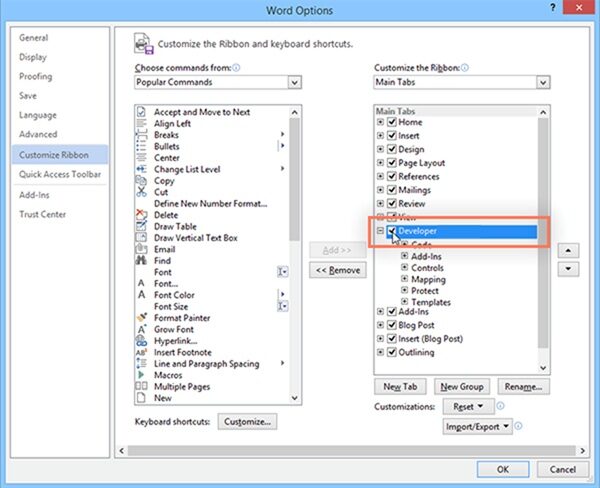
Before you create form elements in a document, you’ll need to activate the Developer tab on the Ribbon.
To do this, click File > Options to access the Word Options dialog box. Select Customize Ribbon, then click the check box for the Developer tab.
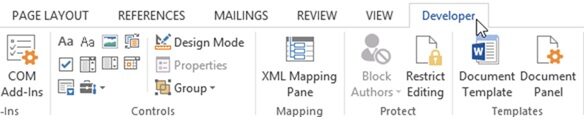
The Developer tab will appear on the Ribbon.
 Now you’re ready to add the different parts of the form, which Word calls content control fields.
![]()
Bonus Tips: